Hardware required:
1>Arduino UNO(r3)
2>ESP8266-01 wifi module
3>4 channel relay
4>Male to female jumper wires
5>Adaptor(output:12V/1Amp)
You could check out amazon or if you live near kolkata Chadni market is where you can get these for really cheap
Software required:
1>Arduino IDE, Link:https://www.arduino.cc/en/Main/Software
2>Blynk library for Arduino, Link:https://github.com/blynkkk/blynk-library/releases/tag/v0.5.4
3>Project files provided
4>Blynk App on Android/iOS, Link:https://play.google.com/store/apps/details?id=cc.blynk
Now,
Steps to make the project:
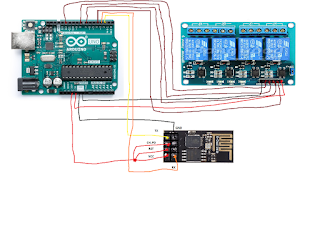
Final Connections:
Project files download:
Here is github linkfor the project: https://github.com/SubrataSarkar32/home-automation
1>Arduino UNO(r3)
2>ESP8266-01 wifi module
3>4 channel relay
4>Male to female jumper wires
5>Adaptor(output:12V/1Amp)
You could check out amazon or if you live near kolkata Chadni market is where you can get these for really cheap
Software required:
1>Arduino IDE, Link:https://www.arduino.cc/en/Main/Software
2>Blynk library for Arduino, Link:https://github.com/blynkkk/blynk-library/releases/tag/v0.5.4
3>Project files provided
4>Blynk App on Android/iOS, Link:https://play.google.com/store/apps/details?id=cc.blynk
Now,
Steps to make the project:
- make connections as in connect2.png
- power up using pc via usb
- open up arduino ide
- Load from File->Examples->Bare Minimum
- Verify and upload the file
- Open serial monitor
- Set NL&CR and baud rate to 115200(this is the default rate)
- Now give command ("AT") it should return ("OK") if you don't get anything check other baud rates or else you need to flash the firmware.
- Now give command ("AT+CWMODE=1) it set the chip in station mode(client)
- Give command("AT+UART_DEF=9600,8,1,0,0") it will change baud rate to 9600
- change baud ratee in serial monitor to 9600
- Now give command("AT+CWLAP") and see if your home wifi gets listed, if not then turn on your home wifi or try to move closer to your home wifi.
- We will try to connect to home wifi network.
- Give command ("AT+CWJAP="home_wifi","password") and it will return text if it gets connected, also you could check using your home wifi's page
- Let's disconnect, give command("AT+CWQAP") it should return ("OK"). Now , that our wifi module is working let us get into the work, make connections as in final.png
- Setup blynk app on your andriod/iOS device.
- Load the code provided making required changes as mentioned in comments to the arduino borad.(Change the blynk Auth token,wifi name/ssid,password with your own)
- Now that your code has been uploaded you can put the device with live circuits, but be careful not to hurt yourself, also you could power the arduino using an adapter.
Final Connections:

Project files download:
Here is github linkfor the project: https://github.com/SubrataSarkar32/home-automation

No comments:
Post a Comment